A green roof on a shed is a practical and eco-friendly way to enhance your outdoor space while promoting sustainability. Green roofs provide natural insulation, reduce stormwater runoff, and create a habitat for wildlife. This guide explains how to build a green roof on a shed, covering everything from planning and materials to installation and maintenance.
Why Install a Green Roof on a Shed?
Before diving into the steps, it’s essential to understand why a green roof can be a valuable addition to your shed. Green roofs are increasingly popular for sheds due to their environmental, aesthetic and practical benefits.
Benefits of a Green Roof on a Shed
- Insulation: Keeps your shed cooler in summer and warmer in winter.
- Stormwater Management: Absorbs rainwater, reducing runoff and flooding risks.
- Biodiversity: Creates a habitat for bees, butterflies, and other pollinators.
- Eco-Friendly Design: Reduces your carbon footprint by capturing CO₂.
- Visual Appeal: Enhances your garden’s aesthetic with a beautiful plant-covered roof.
Planning a Green Roof for Your Shed
Proper planning ensures the longevity and functionality of your green roof. Start by evaluating your shed’s structure and deciding on the best design for your project.
1. Assess the Shed’s Structure
Your shed’s roof must support the added weight of a green roof, including soil, plants, and rainwater.
Consider the following:
- Roof Angle: Green roofs work best on roofs with a pitch of 5-20 degrees. Flat roofs require extra drainage measures.
- Roof Strength: The roof frame should support approximately 60-150 lbs per sq. ft. depending on soil depth and plant type. Consider reinforcing the roof if needed.
- Waterproofing Needs: Ensure the roof surface is waterproof to prevent leaks.
2. Choose the Right Green Roof Type
There are two main types of green roofs suitable for sheds:
- Extensive Green Roof: Best for sheds due to its lightweight design, shallow soil (2-6 inches), and low-maintenance plants like sedums, grasses, and mosses.
- Intensive Green Roof: Requires deeper soil (6+ inches), supporting a wider variety of plants, including flowers and shrubs. This type is heavier and more maintenance-intensive.
3. Select Appropriate Plants
The success of your green roof depends on the plants you choose. Opt for hardy, drought-tolerant plants that can thrive in shallow soil and withstand seasonal changes.
Best Plants for Shed Green Roofs:
- Sedums: Low-maintenance, drought-resistant succulents.
- Wildflowers: Attract bees, butterflies, and birds.
- Grasses: Native grasses add texture and movement.
- Herbs: Thyme, oregano, and chives for an edible roof.
4. Gather Necessary Materials
Here’s what you’ll need for building a green roof:
- Waterproof Membrane: To protect the roof from water damage.
- Root Barrier: Prevents plant roots from penetrating the roof.
- Drainage Layer: Allows excess water to flow away.
- Filter Fabric: Keeps soil from clogging the drainage system.
- Growing Medium (Soil): A lightweight soil mix designed for green roofs.
- Plants or Seedlings: Choose based on your climate and design goals.
- Edging Materials: Wood or metal to frame and contain the green roof.
How to Build a Green Roof on a Shed
Follow these step-by-step instructions to build a green roof on your shed.
Step 1: Prepare the Roof Surface
- Inspect the roof and repair any damage before starting.
- Apply a waterproof membrane (such as EPDM or pond liner) to prevent leaks.
- Secure the membrane tightly to avoid water seepage.
Step 2: Install the Roof Edging
- Install wooden or metal edging around the perimeter of the roof.
- Ensure the edges are high enough (at least 4-6 inches) to contain the soil and plants while allowing proper drainage.
Step 3: Add the Root Barrier and Drainage Layer
- Lay down a root barrier to prevent roots from damaging the roof.
- Install a drainage layer (such as drainage mats or gravel) to channel excess water away from the roof.
Step 4: Place the Filter Fabric
- Add a filter fabric on top of the drainage layer. This prevents soil from washing away while allowing water to pass through.
Step 5: Add the Growing Medium (Soil)
- Spread a lightweight growing medium evenly across the roof.
- The recommended soil depth is 2-4 inches for extensive green roofs.
- Avoid using regular garden soil, which is too heavy.
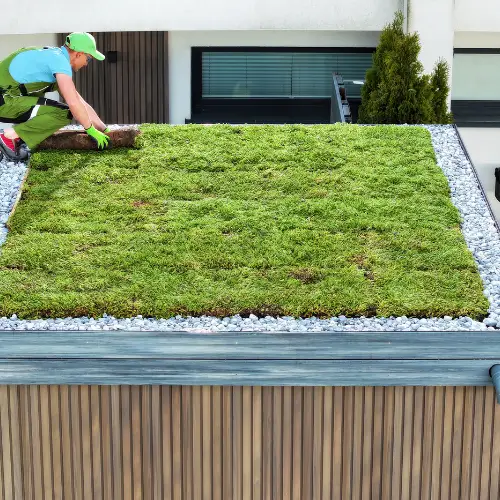
Step 6: Plant Your Green Roof
- Plant Selection: Use pre-grown plant mats or plant plugs for instant coverage.
- Spacing: Space plants 6-8 inches apart for faster coverage.
- Watering: Water thoroughly after planting to help plants establish roots.
Step 7: Add Mulch or Decorative Stones (Optional)
- Add mulch to retain moisture and suppress weeds.
- Use decorative stones around the edges to improve appearance and support drainage.
Step 8: Perform Regular Maintenance
- Watering: Water your green roof during dry periods, especially in the first few months.
- Weeding: Remove weeds regularly to keep plants healthy.
- Fertilizing: Apply an organic fertilizer once or twice a year if needed.
- Inspections: Check the roof periodically for signs of damage or plant issues.
Green Roof Care and Long-Term Maintenance
While green roofs on sheds are generally low-maintenance, routine care ensures longevity and plant health.
Maintenance Tips:
- Seasonal Inspections: Check the roof after winter for plant damage or debris buildup.
- Drainage Checks: Ensure the drainage system remains clear of obstructions.
- Plant Replacement: Replace dead plants as needed to maintain full coverage.
Why Install a Green Roof on Your Shed?
A green roof on a shed is more than just a garden project—it’s a sustainable investment that benefits both the environment and your home. It provides natural insulation, supports biodiversity, and adds a unique, eco-friendly feature to your outdoor space. With the right planning, materials, and care, your green-roofed shed can thrive for years to come.